There has been a large increase in the number of people utilising video conferencing tools to conduct daily meetings, as most businesses move towards adopting remote working arrangements. Microsoft Teams has seen a dramatic increase in the use of their communication and collaboration platform due to the impact of COVID-19.
Microsoft Teams, which launched in March 2017, is the company’s Office 365 chat-based collaboration tool and Microsoft’s fastest growing business application. Microsoft announced that the platform passed 44 million daily active users (DAUs) last month, up from 20 million DAU in November 2019, equalling a 110% jump in just four months. Those users generated over 900 million meeting and calling minutes on Teams daily in a single week. Microsoft used the product’s three-year anniversary to share the new DAU figures and to announce new features coming to Microsoft Teams later this year.
Whether you are brand new to the collaboration tool, or regularly utilise Teams for your daily meetings, there are some innovative features designed to enhance your video conferencing experience and boost productivity, that you could be missing out on:
Tips for enhancing your Microsoft Teams meeting
Initiate a test call to check your audio and video devices
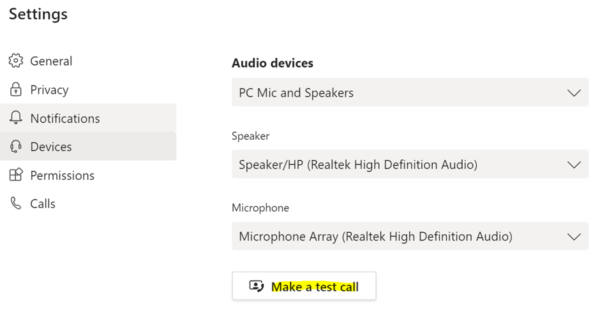
To ensure your audio and video devices are working correctly before entering the meeting, Microsoft Teams has a make a test call function. To make a test call, select your profile picture on the top taskbar, then choose Settings from the dropdown menu. In the new window, select Devices from the left-hand menu and select the make a test call button
Within the test call, you can check your audio and video devices are set up correctly. Following the instructions, you can record a short message and then hear the playback in order to test your audio device. After the call, you will receive a summary of the test call, which you can then use to determine whether you need to make changes to your device settings.
If you are planning on using an external microphone or headset to try and decrease background noise on your conference call, it’s important to be aware that Microsoft Teams may not automatically pick up your external audio devices and will use your computer’s input and output by default. To change your default devices, select the Speaker, Microphone or Camera you want Teams to use from the dropdown list of detected devices on your PC or laptop.
Customise your background
With the huge increase in team meetings taking place via video conference calls, it’s important to think about your location to ensure the conference call is kept professional when working remotely. Microsoft Teams blur your background feature, puts you in the focus, concealing everything behind you.

To enable the background blur feature when entering a call, select the second slider and toggle into the on position (this image shows a user with their video and microphone enabled, with the background blur on).
To enable the feature during a call, hover your mouse over the centre of your screen to view your main call controls. Click the ellipses (…) to view more options and select blur my background.
Microsoft is building on the feature in Microsoft Teams with plans for customisable backgrounds due to be released in April. According to the Microsoft 365 Roadmap, the feature will allow you to upload their own background image, like an office environment or company logo.

Know your controls
When working from home, there may be unexpected disruptions, meaning it’s important to know how to change your settings, such as how to mute your microphone or disable your video if required. These main controls can be found by hovering over the centre of your screen (controls explained from left to right).
Timer – indicating how long the call has been going on.
Video – option to turn your webcam on/off.
Microphone – option to mute/unmute your microphone.
Share – option to share your screen with the other users on the call.
Ellipses – further actions including, device settings, how to enter full screen, view the keypad and record your call.
Show conversation – opens the chat box on the right-hand side of your screen.
Show participants – displays a list of the participants on the call.
Hang up – will hang up your call when the meeting is finished.
If you’re using Microsoft Teams on a daily basis then mastering the keyboard shortcuts will help to save you time, increasing your productivity as you navigate to your most used Teams features. Try these handy keyboard shortcuts to allow you to work more efficiently.
When in a call:
Turn your video on/off: Ctrl + Shift + O
Enable background blur: Ctrl + Shift + P
Mute your microphone: Ctrl + Shift + M
Expand to full screen: Ctrl + Shift + F
You can get a complete list of all your Microsoft Teams keyboard shortcuts for help when navigating Teams, or simply use the keyboard shortcut Ctrl + . to open the menu of shortcuts.
Turn on live captions
Microsoft have recently improved accessibility on Microsoft Teams, allowing participants who are deaf or hard of hearing to read speaker caption in real-time with their live caption feature. This feature may also be useful if you don’t have access to a headset for privacy during a call or are in a noisy location. To enable live captions during a call, go to your main meeting controls and select the ellipses (…) for more actions. You can then select Turn on live captions.
Note: Live captions in Microsoft Teams are a preview feature, and they’re only available in English and on the Teams desktop app for now.
Share your screen
In order to transition meetings from the office to a remote working environment, you may need to share your screen with colleagues when on a call. To share your screen with other participants who are in the meeting, hover over the centre of your screen to access the main controls. Select the Share icon and using the pop-up window choose the display, window or file you want to share with the group.
For extra privacy, share a specific program only rather than your whole desktop, this will safeguard any sensitive information you may have open. As the presenter, if you hover over the top of your screen, you will see a new presenting taskbar, from here you can give participants control over your screen, if needed, by choosing their name from the dropdown menu. You can also share your audio with the call participants by selecting the “include system audio” option.
Explore the whiteboard feature
Another impressive collaboration feature is the Whiteboard feature in Microsoft Teams, allowing meeting participants to draw, sketch, and write together on a shared digital canvas. To open the whiteboard feature when in a meeting, hover over the centre of your screen to access the main controls and select the Share icon. Using the pop-up window, select Microsoft Whiteboard from the Whiteboard section on the far right-hand side of your screen. This easily allows all participants of the call to simultaneously contribute to the shared canvas.
The same whiteboard can also be opened in the Microsoft Whiteboard app for additional intelligent functionality, including, ink grab and ink beautification.
Record your call
It is common practice during a meeting, for a dedicated person to take detailed notes of the call, however this is no longer required when using Microsoft Teams, as Teams gives you the ability to record your Teams meeting, capturing audio, video and screen sharing activity. The recording happens in the cloud and is saved in Microsoft Stream, so you can share it securely across your organisation. To record your meeting, hover over the centre of your screen to access the main controls and select the ellipses icon (…), this will display further actions including start recording. Everyone in the meeting will then be notified that the recording has started. Once the recording is stopped, Teams will process the recording and save the file to Microsoft Stream, you can then locate the recording in the meeting chat.
When used correctly, these collaborative features in Microsoft Teams can improve workplace productivity, even when staff are working remotely. Utilising the video conferencing tools allows users to interact with colleagues with increased flexibility, helping businesses to have more effective and productive remote meetings. You can find further tips on how to optimise your video conference call in our latest insight.